In today's digital age, PDFs (Portable Document Format) have become a standard for sharing and presenting documents across different platforms. Whether you're a student, professional, or just someone who frequently interacts with documents, knowing how to edit a PDF on Maccan greatly enhance your productivity.
With the built-in tools of macOS, you have the power to make annotations, add signatures, manipulate text, rearrange pages, and even reduce file sizes directly within the comfort of your Mac environment. This comprehensive guide will walk you through various techniques to edit PDFs on your Mac, utilizing the capabilities of applications like Quick Look and Preview.
How To Edit A PDF Using Quick Look
Quick Look is a versatile tool integrated into macOS, allowing you to preview and make simple edits to PDF files without needing to open a separate application.
- Locate the PDF -Begin by finding the PDF file you want to edit on your Mac.
- Open Quick Look -Select the PDF file and press the spacebar on your keyboard to open Quick Look. This action will display a preview of the PDF content.
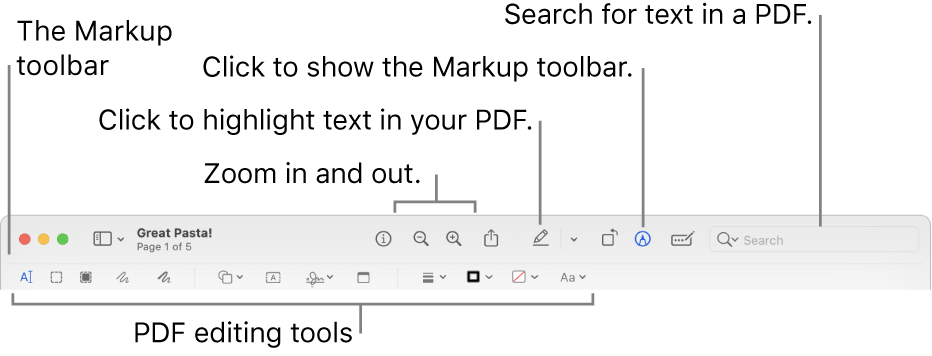
- Activate Editing Mode -To initiate editing, click on the pencil icon located in the top toolbar of the Quick Look window. This will switch the preview into editing mode.
- Access Editing Tools -After entering editing mode, a toolbar containing various editing tools will be accessible. These tools include options for highlighting text, adding text boxes, and drawing shapes directly onto the PDF.
- Save Your Changes -Once you've made the necessary edits, click the "Done" button situated in the toolbar. This action will save the alterations you've made to the PDF.
How To Add A Signature Using Quick Look
Quick Look can also be used to include your signature in a PDF document, making it convenient for signing digital forms and documents.
- Select the PDF -Locate the PDF file that requires your signature and select it.
- Access the Signature Tool -While viewing the PDF within Quick Look, locate and click on the signature icon present in the toolbar. This will open the signature tool.
- Create Your Signature -You have several options for creating your signature:
- Save Your Signature -Once you've generated your signature using the preferred method, click "Done" to save it.
- Add Signature to the PDF -Select the saved signature and drag it to the appropriate location within the PDF. You can also resize the signature to fit accordingly.

How to Edit PDFs Using QuickLook and Preview on Your Mac?
How To Edit A PDF Using Preview
Preview is a versatile application bundled with macOS that serves as a PDF viewer and editor. Although it might not offer direct text editing capabilities, it provides a range of annotation and manipulation features.
- Open PDF in Preview -Start by locating the PDF file you wish to edit. Right-click on the file and select "Open With" > "Preview." Alternatively, you can launch Preview and use the "File" menu to open the desired PDF.
- Access Markup Tools -In the Preview application, click on the "Show Markup Toolbar" button, represented by a toolbox icon. This will reveal a selection of markup tools.
- Utilize Annotation Tools -Utilize the available markup tools to annotate the PDF. These tools enable you to highlight text, underline, strikethrough, draw shapes, and add text boxes to the PDF content.
- Add Text -While direct text editing is not a built-in feature, you can add text to the PDF using the "Text" tool within the markup toolbar. This tool allows you to create text boxes and overlay text onto the document.
- Save Your Edits -After completing your annotations and edits, save the changes to the PDF by navigating to the "File" menu and selecting "Save."
How To Add Text To A PDF On A Mac
Although Preview might lack direct text editing capabilities, you can still incorporate text into a PDF using its annotation tools.
- Open PDF in Preview -Launch the Preview application and open the PDF file to which you want to add text.
- Access Markup Tools -Click on the "Show Markup Toolbar" button within Preview to gain access to the markup tools.
- Utilize the Text Tool -Locate and click on the "Text" tool, identifiable by the "T" icon inside a box. This tool enables you to create a text box where you can input your desired text.
- Add Your Text -Click on the PDF at the location where you intend to insert text. This action will generate a text box that you can type your text into.
- Customize Text Formatting -Customize the appearance of your added text by utilizing the formatting options available, such as font, size, color, and alignment.
- Save Your Changes -Once you've added the desired text, save the modifications to the PDF by selecting "File" > "Save."
How To Tick (Checkmark) A Box In A PDF
PDF documents often incorporate checkboxes for various purposes. While some PDF viewers might provide direct checkbox functionality, you can manually include a tick (checkmark) using annotation tools in Preview.
- Open PDF in Preview -Begin by opening the PDF file containing the checkbox you want to tick.
- Access Markup Tools -Click on the "Show Markup Toolbar" button within the Preview application. This action will reveal a collection of markup tools.
- Use the Shape Tool -Within the markup toolbar, locate the "Shapes" tool and select a rectangle or square shape.
- Create the Checkmark -Position the rectangle or square shape over the checkbox in question. To include a tick, use the "Text" tool to insert a checkmark character (✔) within the confines of the shape.
- Adjust Position and Save -Resize and adjust the position of the shape as needed to accurately represent the checkbox as checked. Save your changes to the PDF by selecting "File" > "Save."
Copying Text From A PDF
Copying text from a PDF document is a common requirement, whether it's for citation, note-taking, or other purposes. Here's how you can do it:
- Highlight the Text -Using your cursor, click and drag to highlight the text you want to copy within the PDF.
- Copy the Text -Once the desired text is highlighted, right-click on the selection and choose the "Copy" option from the context menu. Alternatively, you can use the keyboard shortcut "Command + C."
- Paste the Text -Open the application where you want to paste the copied text, such as a word processor or a text editor. Right-click within the application and choose "Paste" from the context menu or use the keyboard shortcut "Command + V." This will paste the copied text into the new location.
Adding Notes And Comments To A PDF
Adding notes and comments to a PDF is a helpful way to provide feedback, annotations, or explanations. Preview offers built-in tools for this purpose:
- Open the PDF -Launch the Preview application and open the PDF file you want to add notes and comments to.
- Access Markup Tools -Click on the "Show Markup Toolbar" button within Preview to access the markup tools.
- Select the Note Tool -Choose the "Note" tool, represented by a speech bubble icon.
- Add a Note -Click on the location within the PDF where you want to add a note or comment. A small note icon will appear, and a text box will open where you can type your note.
- Customize the Note -Resize and reposition the note as needed. You can also format the text within the note using the available formatting options.
- Save Your Changes -After adding the notes and comments, save the modified PDF by selecting "File" > "Save."
Creating Shapes In Preview
Preview allows you to create shapes such as rectangles, circles, arrows, and lines, which can be useful for highlighting or drawing attention to specific areas in a PDF:
- Open the PDF -Launch the Preview application and open the PDF file you want to work with.
- Access Markup Tools -Click on the "Show Markup Toolbar" button within Preview to reveal the markup tools.
- Select a Shape Tool -Choose the appropriate shape tool from the markup toolbar, such as the rectangle, circle, or line tool.
- Draw the Shape -Click and drag on the PDF to draw the selected shape. You can adjust the size, position, and orientation of the shape as needed.
- Customize the Shape -After creating the shape, you can customize its appearance using the options in the markup toolbar. For example, you can change the fill color, line color, and line thickness.
- Save Your Changes -Once you've added the desired shapes, save the changes to the PDF by selecting "File" > "Save."
How To Rearrange And Add Pages To A PDF
Rearranging and adding pages to a PDF can be done using the Preview application:
- Open the PDF -Launch Preview and open the PDF document you want to modify.
- View Thumbnails -Click on the "View" menu and select "Thumbnails" to open the thumbnail view of the PDF pages.
- Rearrange Pages -To rearrange pages, simply click and drag a thumbnail to a new position within the thumbnail pane.
- Add Pages -If you want to add pages from another PDF or image file, open the source PDF/image in Preview. Select the pages you want to add from the thumbnail pane, and then drag and drop them into the thumbnail pane of the target PDF.
- Save the Changes -After rearranging or adding pages, save the modified PDF by selecting "File" > "Save."

How To Compress PDF File Size Without Losing Quality - Full Guide
How To Reduce A PDF File Size
Large PDF files can be cumbersome to share or store. You can use Preview to reduce the file size:
- Open the PDF -Launch Preview and open the PDF file you want to reduce in size.
- Access Export Options -Select "File" > "Export..." In the export window, you can choose the format "PDF" and adjust the settings.
- Adjust Quartz Filters -In the export window, click on the "Quartz Filter" drop-down menu. Select a filter that reduces the file size, such as "Reduce File Size."
- Preview Filter Effects -You can click on the "Preview" button to see a preview of how the filter will affect the PDF.
- Save the Reduced PDF -After selecting the appropriate filter, click the "Save" button. The new PDF with reduced file size will be saved.
People Also Ask
How Do I Type On A PDF In Chrome?
To type on a PDF using Chrome, follow these steps:
- Select the Edit PDF tool -Open the PDF in Chrome and select the "Edit PDF" tool.
- Upload your document -Click the blue "Select a file" button to upload your PDF. You might also drag and drop the file into the editor.
- Add Text Comment -Once uploaded, use the "Add Text Comment" tool to type your text directly onto the PDF.
Can Any PDF File Be Edited?
Absolutely. Regardless of whether you're using a Mac or Windows computer, you have access to tools that let you edit text and graphics within a PDF document. These tools are available online as well. You can also convert PDFs back into Microsoft Word documents to edit the content in its original, editable format.
How Do I Enable All Features In PDF?
To enable all features in a PDF, follow these steps:
- Click the Advancedtab in the PDF.
- If Protected View is enabled (status: Protected Mode: On), and you trust the source, click Enable All Features.
- The PDF will be added to your list of trusted locations and will be accessible without restrictions.
Why Can't I Edit A File On My Mac?
If you're encountering a "Your account can view documents but it doesn't allow editing on a Mac" error, it's likely due to an expired or incorrect license (without editing rights). To check your Microsoft license:
- Visit portal.office.com.
- Log in to your account to verify your license status.
Can You Edit A PDF In Google Docs?
Editing a PDF in Google Docs can be done this way:
- Open Google Docs.
- Locate your PDF file in Google Drive.
- Right-click the PDF file and select Open With > Google Docs.
- Make edits to your document as needed.
Why Can't I Select Text In PDF On Mac?
If you're unable to select text in a PDF on your Mac, consider these solutions:
- Ensure the Text Selection toolis chosen. Go to Tools > Text Selectionor click the Show Markup Toolbarbutton and then the Text Selection button.
- Some PDFs might require a password before you can select or copy text. To address this, go to Tools > Show Inspector, click the Encryption Inspector button, and enter the password.
Conclusion
Knowing how toedit a PDF on Mac empowers you to efficiently manage your digital documents with precision and ease. The native tools like Quick Look and Preview elevate your PDF editing experience by allowing you to add signatures, make annotations, rearrange pages, and optimize file sizes.
From students collaborating on projects to professionals handling important contracts, these techniques enable you to leave your mark on digital documents while maintaining a seamless workflow.
So, the next time you're faced with a PDF that needs editing, remember that your Mac offers a range of powerful tools right at your fingertips. By following the steps outlined in this guide, you can confidently navigate the world of PDF editing on your Mac, ensuring that your documents are always up-to-date, organized, and ready to be shared.